Lesson 7: Using The Gimp to Reduce Your Wreath's Prim Counts (Part 2)
Part 1
Step 5: Right Sizing in Second Life
We want to ensure that when we go to load our wreath back into Second Life that it will not be squashed or stretched in any direction. There is a really neat trick to make sure it looks the same in Second Life as it does right now.
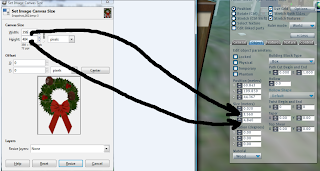
Go to Image > Canvas Size.
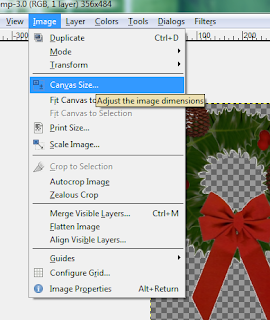
On a piece of paper/back of your hand/your sleeping roommate's forehead, copy down the numbers listed for width and height. Then click "Cancel". We don't want to change anything on this screen, just get information.
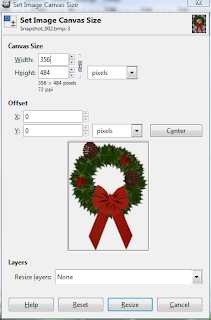
We will come back to this later.
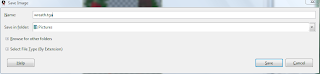
Step 6: Saving Properly
Go to File > Save As (why "As"? because you are already using a pre-made file and it will just save over your snapshot unless you do something different) and name it "wreath.tga". Now click Save and agree to whatever pre-sets it asks you to agree to.
That's it. That's all you have to do to save transparency in Gimp. You can now laugh at your friends who are using Photoshop and freaking out at something called an "Alpha Layer". You don't have to mess with that. Win for you!
Step 7: Uploading and Creating Your One-Prim Wreath
Open up Second Life. Press [Ctrl] + [U] to upload an image. This is where your 10 L$ comes in, so you need to have it if you want to pass this step.
Browse over to wherever you saved "wreath.tga" and select it. This will now give you a preview window that looks something like this:
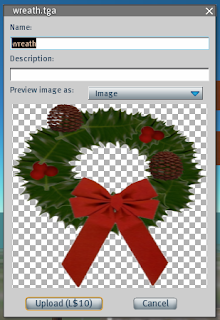
Look at how squashed it looks. No matter, we'll fix that shortly. Feel free to re-name the image whatever you want and then click "Upload (L$ 10)". Bye-bye hard earned L$!
By the way, for those of you wondering how Linden Lab makes their money, they make some of it off of upload fees such as this. So don't consider it a fee to be avoided, but a "Thank you" for the ability to play Second Life at all.
Now, rez a cube. "How?" you ask. Rewind your brain back to the rezzing of the cubes that we did during our class to build the multi-prim wreath to begin with. Or you can watch this YouTube video ( http://tinyurl.com/2tgngn).
Texture all of the sides in "Transparent". Select-Texture the front side with your wreath. I've already put my wreath into mostly-position for this picture, but here is what I've got:
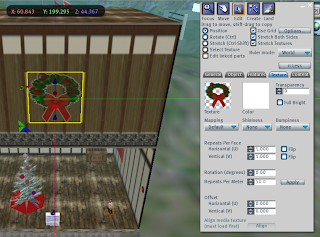
Now comes the tricky part: getting the sizing right. Retrieve the written figures from Step 5 and click on the Object tab for your wreath prim. Set the Y-Size value to match the "width" and the Z-Size value to match the height. Except, rather than inputting the numbers as ###, which is how The Gimp gave them to you, you input them as #.##. Perhaps this picture will make that clear:
Now, aside from the fact that you might need to change your width to being on the X-Size instead (you'll know if you need to do it), you are finished.
See, now wasn't that easy?
Step 5: Right Sizing in Second Life
We want to ensure that when we go to load our wreath back into Second Life that it will not be squashed or stretched in any direction. There is a really neat trick to make sure it looks the same in Second Life as it does right now.
Go to Image > Canvas Size.

On a piece of paper/back of your hand/your sleeping roommate's forehead, copy down the numbers listed for width and height. Then click "Cancel". We don't want to change anything on this screen, just get information.

We will come back to this later.
Step 6: Saving Properly
Go to File > Save As (why "As"? because you are already using a pre-made file and it will just save over your snapshot unless you do something different) and name it "wreath.tga". Now click Save and agree to whatever pre-sets it asks you to agree to.

That's it. That's all you have to do to save transparency in Gimp. You can now laugh at your friends who are using Photoshop and freaking out at something called an "Alpha Layer". You don't have to mess with that. Win for you!
Step 7: Uploading and Creating Your One-Prim Wreath
Open up Second Life. Press [Ctrl] + [U] to upload an image. This is where your 10 L$ comes in, so you need to have it if you want to pass this step.
Browse over to wherever you saved "wreath.tga" and select it. This will now give you a preview window that looks something like this:

Look at how squashed it looks. No matter, we'll fix that shortly. Feel free to re-name the image whatever you want and then click "Upload (L$ 10)". Bye-bye hard earned L$!
By the way, for those of you wondering how Linden Lab makes their money, they make some of it off of upload fees such as this. So don't consider it a fee to be avoided, but a "Thank you" for the ability to play Second Life at all.
Now, rez a cube. "How?" you ask. Rewind your brain back to the rezzing of the cubes that we did during our class to build the multi-prim wreath to begin with. Or you can watch this YouTube video ( http://tinyurl.com/2tgngn).
Texture all of the sides in "Transparent". Select-Texture the front side with your wreath. I've already put my wreath into mostly-position for this picture, but here is what I've got:

Now comes the tricky part: getting the sizing right. Retrieve the written figures from Step 5 and click on the Object tab for your wreath prim. Set the Y-Size value to match the "width" and the Z-Size value to match the height. Except, rather than inputting the numbers as ###, which is how The Gimp gave them to you, you input them as #.##. Perhaps this picture will make that clear:

Now, aside from the fact that you might need to change your width to being on the X-Size instead (you'll know if you need to do it), you are finished.
See, now wasn't that easy?
Labels: tutorial


for this post
Leave a Reply