Second Learning


(ADV) Japanese Tea Scene - The Magic of Texture Mapping


*Crackerbox* (ADV) Japanese Tea Scene - The Magic of Texture Mapping
Instructor: Jasmin Loire
Start Time: 8 AM SLT
Duration : 1.5 Hours
Cost : 0 $L
Prerequisites: familiarity with entering numbers into edit, familiarity with the "select texture" feature, complete at least 3 intermediate classes on building
Class Size : 9 - Strictly Enforced

What a makes a great build? A build that rezzes all at the same time, of course! Come learn how to use texture mapping skills to apply THE SAME texture to all parts of your build so that they all show up at the same time. For our purposes, we are creating a warm and social Japanese-themed tea room scene. Feel free to come in costume!

-- Want more details? Check the blog ~ http://tinyurl.com/3ynzcz --

There are teleports to travel between all three levels: ground classroom, sky classrooms, and sandbox. Tutorials to do on site or for purchase...and MORE.

Teleport directly to the classroom. | Sponsor me!

------------------------

Dates Offered: Check the Google Calendar.

------------------------

No time/date that works for you? You have two options:

(1) Comment on this blog or IM Jasmin Loire in-world with a suggested time (it has to be the dates listed however). She may be willing to reschedule a class to fit your schedule.

(2) Buy the class-to-go. It is almost as good as the real thing. Only 200 L$.

------------------------

We've got photos.

Labels:


Class Was a Success!

I would like to start with and admission: I had so much fun with class that I did not take any pictures. I'll have to take them at the next event.

I had so much interest for this class that I had to turn folks away. I really hope that those folks are watching this blog so that they can be sure to catch the next session of the class.

Due to the complexity of the build, I'm going to try to keep it to no more than 5 students. Because of that, people will have to get to class early, or else it will fill up.


^^ Is a picture of all of the teachers that were teaching at the same time. Look, Ansa isn't dressed entirely in black (she usually is).

Aside from realizing that I had some old lines in my class script (which I have since removed), I've come to realize that I need to explain two parts of my teaching philosophy.

========== Why are things "no transfer"? ==========
That wasn't an oversight by a teacher who hasn't yet fully learned her way around the permissions system. I did this on purpose.

When I teach a class, I am teaching the class to give people a certain skill set, in this case texture mapping. And you even get a notecard with all the necessary information to take home and use as you wish. And a full permission texture, so that you can build anything you want with the textures used in class. And class notes, which tell you how to build all of the objects that have been delivered as "no transfer".

You don't get the sitting positions or scripts (my EduCube business side needs protecting, after all) to be full perms, but you can still modify and copy them for your own personal use.

I want you to come away with skills. Just skills. I don't want to see the build that I just taught you how to make on the market immediately. I know, as a student, you are clasping your chest in horror and saying, "Who? Me?" and it is true that most of you are not the type to immediately go out and sell what has been given to you for free.

But there are a few bad eggs in every bunch. And in my opinion, they've ruined it for you.

We teachers have names for these folks: supply skimmers, class rippers, etc. They are folks who either sell an unmodded class build, or the class supplies themselves.

I know, there is attraction to get rich quick, but setting a supply as no-transfer is a way of working within the Linden system to ensure that such bad eggs cannot get rich off of my efforts.

You know how long it took me to put together this class -- supplies and all -- for you? A full month of weekends (that is 8 sun-up to sun-down days). If anyone should get rich quick off of selling the supplies, it should be me :)

But if you came to class, participated, worked hard, even were inspired, and now you want to gift your bestest of online friends with the build, I have a transferable (no copy) version that I will be happy to give you once class is over. You just have to IM (^_^)y

Labels:


Class: Japanese Tea Scene

Well folks, here it is. To graduate from the TUi Instructor Training Course, I have to teach my 1 hour class on the magic of texture mapping to a maximum of 5 students. I cannot guarantee you a spot, so show up early if you really want to take this class.

LVL2: Japanese Tea Scene - The Magic of Texture Mapping


Instructor: Jasmin Loire
Start Time: 6 AM SLT
Duration : 1 hour solid
Cost : 0 $L
Prerequisites: familiarity with entering numbers into edit, familiarity with the "select texture" feature, complete at least 1 LVL1 class on building
Class Size : 5

What a makes a great build? A build that rezzes all at the same time, of course! Come learn how to use texture mapping skills to apply THE SAME texture to all parts of your build so that they all show up at the same time. For our purposes, we are creating a warm and social Japanese-themed tea-for-two scene.

~ TIC- Teacher's in Creation~

Teleport directly to the classroom.

Labels:


New Pose: Disarming

Buy from OnRez | Buy from EduCube Headquarters | Attend a Class and Get it for Free


Introducing a new pose from EduCube: Disarming. A completely-natural looking ground-sit where you are leaning back on your hands.

Already hailed as a pose that, "Makes me look so good!" this ground-sit pose looks completely natural. Attention to details has been paid to all parts of the pose which has resulted in a gentle curve to the upper body. No more "stiff as a board" upper bodies that make you look as if you are permanently stuck in the v-sit Pilates position.

And at the upload-fee-only price of 10 L$, how can you go wrong!

Since this pose is copy-able, feel free to drop one copy in your AO, another in your favorite furniture, and yet another in your favorite poseball.

This pose was created due to a need for a realistic lean-back ground sit at a reasonable price.

Labels:


What has Jasmin Been Up To

Things have been pretty quiet on the blog for a while, but there is a reason for that. The reason is that I have been taking an in-world Instructor Training Course. This has taught me many new skills for being a better EduCube instructor, as well as reinforcing those I've already gained.

That said, my course ends on Sunday with our Student-Teacher Expo. At the Expo, I can only have five students attend my class, so keep in mind that if you click the link from my blog (once there is one; my time and location are still TBA to me) the class may have already filled up.

What are we building? Well, I'll give you a hint: the title of my class is, "LVL2: Japanese Tea Scene - The Magic of Texture Mapping". If you've seen and coveted my Treasure Quest prize - more on that later - then this is the class for you. We will be building the tatami-mat/hearth/teapot/zabuton part of the larger garden.

==========

Treasure Quest

I submitted my application to be a stop on the Treasure Quest route about a month ago. As of yet, I haven't heard back, however I'm sure that anyone who comes by my place will fall instantly and madly in love with the place and will want to include me in their Treasure Quest. Because of that, I've already gone ahead and built my prize, which I then photographed which is why it looks so low resolution.

Viv Perrin, official EduCube photographer, has Windlight and that's why her pictures end up so beautiful.

At any rate, stay tuned to this spot for the announcement of when I will be appearing in a Treasure Quest.

==========

Two New Classes

EduCube will soon be announcing two new classes to its line up. One is seasonal and the other is not. One is creating a cute, sculpted tiny heart avatar, with pink feet and hands. Everyone who has seen my demo avatar has squealed with delight and they all say, "Oh that's just so cute!"

So if you've ever wanted to change your avatar into a silly shape, just for fun, then you'll be waiting with anticipation for the class announcement (which will appear both here and in our in-world group (do a search for EduCube ... we are the first option).

And the second class: A beginner's primficient chair build. We will be building the spherical hideaway chair pictured in this blog entry. Isn't Viv's viewer much better than mine? She took that picture and chair actually looks like a globe. I won't even tell you what it looks like to me on my viewer :)

Anticipation makes the build all that much sweeter.

Stay tuned!

Labels:


SL Outfits

One of the things I like about the TUi Instructor Training Course I'm taking is that my group is made up of really great gals and we seem to mesh as a group. I've heard murmurings from others in the class that their groups are a little less cohesive. The deal with our group is that we all have familiarity with the same SL gadgets, so we spend less time telling each other what an individual item does, and more time discussing practical uses of such.

That said ... one of my group-members - and dare I say internet-friends - and I had a chat today about identity. You see, we are not of the fashionista movement that appears to have overtaken Second Life. One of the things I mentioned, having no evidence at all, was that I think that a greater percentage of people in Second Life are into more daring fashions than are available in Real Life.

Prove me right. Take my poll so I have some data. The poll (survey?) asks how many outfits you've collected over your Second Lifetime. Don't worry, your answer is completely anonymous.

So what are you waiting for, I need data!

For the record, I have 7 outfits put together right now. I soon will have 8, since I find that I keep ending up in Vampire/Dungeon parties (which have no sexual overtones, thank-you-very-much) so I figure I need something a little more appropriate to wear than my usual t-shirt and jeans.

Labels: ,


Lesson 11: How to Make a Photo-sourced Seamless Texture in GIMP

== Step 1 ==
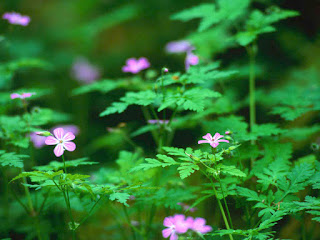
Start with the photo that contains your ideal texture. There are a lot of places where you can get photos to use, but my absolute favorite is Flickr Creative Commons. Of course, it goes without saying that you download the photo. Duh.

But for our purposes here, I'm just going to use one of the photos that comes standard with Windows (XP = My Documents > My Pictures > Sample Pictures, Vista = Public > Public Pictures > Sample Pictures).


== Step 2 ==
Open GIMP. Don't have GIMP yet? What are you waiting for? See my wreath prim-reduction tutorial for details on how to get GIMP.

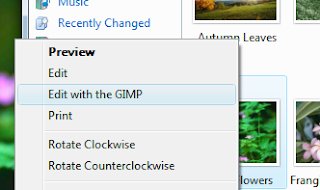
In order to open GIMP, right click on your image that you've saved to your hard drive, and select “Edit with GIMP”.


== Step 3 ==
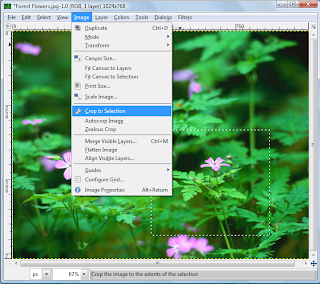
Select the area you wish to make seamless. In your main GIMP window, click on your rectangle select tool. Then, down below in the individual tools option, check next to “Fixed”, choose “Aspect Ratio” from the drop-down list, and type in “1:1”. It is important when creating a Second Life seamless image to have it be a perfect square and this will force you to use a perfect square.

Then select a portion of your image that you wish to turn into the texture. The remainder of your image will be cropped away later, so keep that in mind.

== Step 4 ==
In order to crop down to the part we want, go to Image > Crop to Selection. Now all that should be left is your square (surrounded by the marching ants) and your sanity. Leave the marching ants.


== Step 5 ==
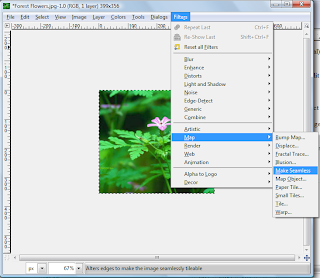
Now we get to make it tile. Go to Filters > Map > Make Seamless and click on it. Some moments later, the image will be rendered as an image that can seamlessly tile. If you want to make other textures from this one photo, play around with the other options under Filters > Map. Some are pretty cool.


== Step 6 ==
Our last step is to save this in a format that will upload well to Second Life. Recommended file format is “.tga”. Go to File > Save AS. Then when the next screen pops up, choose wear to save it and call it “Something.tga”. You have to type in the extension or else GIMP saves it in a format of its own choosing, which does not play nice with Second Life.

Now just go to Second Life and upload. That was easy!


As always, tips and blog post recommendations are greatly accepted, however Olivia **** (last name omitted for privacy reasons) has already paid me to post this tutorial for her. Yes, you, too, can have a post created just for you. Drop a comment here, or IM Jasmin Loire in-world with what you'd like to know. I'll tell you whether or not I know enough to help you out.

For now, this is -= Jasmin Loire =- signing off! Have a splendorous week. My real life students come back to school this week, so I know that I will be!

Labels:


Lesson 10: Alpha Layer Transparency in GIMP

Materials Needed
- The GIMP
- 10 L$

What is The GIMP?
The GIMP is an image-manipulation program similar to Adobe's Photoshop, but it is free, open source, and much easier to use when creating alpha textures.

Can I learn in world?
Yes. I highly recommend the tutorial located here (you will need to click on "Classes/Seminar" to teleport). I did not make this tutorial, but found it and thought that I would link to it to augment my tutorial.

How To
1. [Image] Click on "File" and select "New".
2. [Image] You can choose whatever size/template you want for your image, but the most important thing is to expand (by clicking on the plus sign) the "Advanced Options".
3. [Image] Make sure that the background is set to "Transparency". This might require you to click on the drop-down arrow in order to choose this setting. Your new image will have a checkerboard background. This is good, the checkerboard indicates everything that will have a transparent portion.
4. [Image] Create your image that requires a transparent portion. As you can see, I chose to make an ornate window. You can get a copy of my GIMP-created window here. The base image that I used came from Flickr Creative Commons. Thanks Frazerweb.
5. [Image] Now is the hard part: saving properly. Go to File > Save As. In that window, you are going to type in the name of your file. I'll call mine "Window.tga". The most important thing to remember is to type in the ".tga" part. Also, make sure that you accept whatever pre-sets it asks of you with regard to saving.
6. Open Second Life and click [Ctrl] + [U]. This is where your 10 L$ is going to come in.
7. [Image] Navigate to where you saved your image and upload it. Notice in the preview that all of the transparent parts are still transparent (as indicated by the checkerboard pattern).

Ta da! That's it. Not too hard was it? If this was helpful to you, please remember that tips are happily accepted. Just tip the japanese-style donation box (called a saisenbako).


gimp7Also, if you've gone to all the trouble to download my window gimp file, why not just save yourself the time it would take to size the window correctly and just head over to the EduCube Headquarters where you can buy an already uploaded/scaled correctly window object for the same price you would pay to upload your own texture.

Labels:


My Treasure Quest Prize

Welcome to the wonderful world of EduCube! I hope you look to us for all of your primficient furniture and educational-related pre-fab needs. While you are here, please check out the rest of our blog to see what other goodies are in store.

"How?" you ask.

Just click on the "Second Learning" at the top of this page, or the "Home" button to the right. Either will take you to the bounty of useful tutorials.

If you haven't unpacked your gift (either because you don't have land, or are afraid of going over your prim counts), I highly recommend taking it to a sandbox, so that you can see the tranquil japanese-themed koi garden inside.


Because Second Life won't allow me to post hyperlinks in-world, there are a few people I need to thank for their photographs which helped me build the marvelous koi garden:

First I would like to thank Aleksander Dragnes for providing the photo of the Koi which also allowed me to sample textures for the stonework around the Koi pond. He (I'm assuming it is a he based on the name) released the koi picture under the Creative Commons: By Attribution license and so I'm required to give proper credit where it is due. But who wouldn't want to thank the photographer!

Here's What you Get!
* Two benches, good for sitting on while contemplating the tranquility of the area. Each bench seats more than one. No snuggling, cuddling, or drama. Just peaceful tranquility. And do I detect the faint chirp of crickets?

* Peaceful koi pond. Watch photo-sourced koi swim in lazy circles as fireflies dance overhead.

* A torii to welcome you to your tranquil-destress time. Torii are gates that mark the difference in between the sacred and the profane. For our purposes, relaxation is sacred. The torii has a lit lantern hanging from it to light your way come night-fall.

* Peace-lilly foliage dotting the landscape.

* A tatami-mat with a functional hearth supporting a pot for tea. If you listen closely, you can hear the flames lick at the bottom of the tea pot, while you watch the pot steam. If you touch the tea pot, you may even get a cup of green tea to sip.

* And of course, one cannot drink tea without an appropriate seat. There are four zabuton arranged around the hearth. The zabuton are covered with traditional kimono fabric as found in the EduCube book on kimono.

What I ask in return is for you to leave a comment on this blog with the amount you would be willing to pay for such a prefab. Because, yes, I am planning on listing this item for sale in the near future, but I want the pricing to be fair. Since you already have a free one, no need to be greedy by purposefully underpricing the build. What do you think? 500 L$? More? Less?

And comments with pictures of you using the garden are always welcomed. If you cannot tell, my default browser is set for speed over pretty. If yours renders the koi pond as a circle (as it rightfully should be), please consider snapping a free picture and dropping a comment with a link to an Imageshack location where I can pick it up.

Labels: ,


Calling All Shopping Fanatics!

Help me find more professional clothing! Especially of the provocative suit variety. Nothing you couldn't wear to work, but nothing frumpy either.

Oh, and it has to be 50 L$ or less.

Can you do it? If so, comment here with the following -

Location: (sim name and coordinates, SLURL)
Item:
Price:
For Male/Female/Unisex:
Your SL Name: (so's I can give you credit if it ends up in a future post)
Your Website: (so's I can give you credit if it ends up in a future post; blog website, SLURL to your store, etc.)
OPTIONAL an image of you modeling the find.

The winner (the person offering the best suit for the cheapest price) will win a free, custom EduCube. The contest ends on 1/1/2008. Only two entries per person, please.

Go forth and dazzle!

Labels: