Lesson 11: How to Make a Photo-sourced Seamless Texture in GIMP
== Step 1 ==
Start with the photo that contains your ideal texture. There are a lot of places where you can get photos to use, but my absolute favorite is Flickr Creative Commons. Of course, it goes without saying that you download the photo. Duh.
But for our purposes here, I'm just going to use one of the photos that comes standard with Windows (XP = My Documents > My Pictures > Sample Pictures, Vista = Public > Public Pictures > Sample Pictures).

== Step 2 ==
Open GIMP. Don't have GIMP yet? What are you waiting for? See my wreath prim-reduction tutorial for details on how to get GIMP.
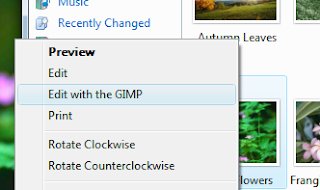
In order to open GIMP, right click on your image that you've saved to your hard drive, and select “Edit with GIMP”.
 == Step 3 ==
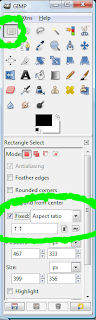
Select the area you wish to make seamless. In your main GIMP window, click on your rectangle select tool. Then, down below in the individual tools option, check next to “Fixed”, choose “Aspect Ratio” from the drop-down list, and type in “1:1”. It is important when creating a Second Life seamless image to have it be a perfect square and this will force you to use a perfect square.
Then select a portion of your image that you wish to turn into the texture. The remainder of your image will be cropped away later, so keep that in mind.
== Step 4 ==
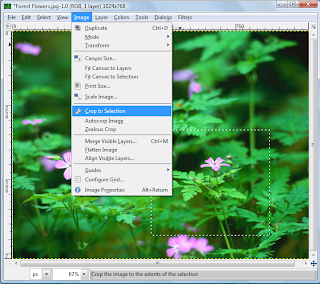
In order to crop down to the part we want, go to Image > Crop to Selection. Now all that should be left is your square (surrounded by the marching ants) and your sanity. Leave the marching ants.
== Step 5 ==
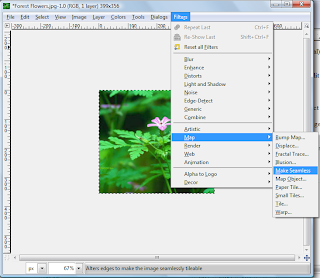
Now we get to make it tile. Go to Filters > Map > Make Seamless and click on it. Some moments later, the image will be rendered as an image that can seamlessly tile. If you want to make other textures from this one photo, play around with the other options under Filters > Map. Some are pretty cool.
== Step 6 ==
Our last step is to save this in a format that will upload well to Second Life. Recommended file format is “.tga”. Go to File > Save AS. Then when the next screen pops up, choose wear to save it and call it “Something.tga”. You have to type in the extension or else GIMP saves it in a format of its own choosing, which does not play nice with Second Life.
Now just go to Second Life and upload. That was easy!

As always, tips and blog post recommendations are greatly accepted, however Olivia **** (last name omitted for privacy reasons) has already paid me to post this tutorial for her. Yes, you, too, can have a post created just for you. Drop a comment here, or IM Jasmin Loire in-world with what you'd like to know. I'll tell you whether or not I know enough to help you out.
For now, this is -= Jasmin Loire =- signing off! Have a splendorous week. My real life students come back to school this week, so I know that I will be!
Start with the photo that contains your ideal texture. There are a lot of places where you can get photos to use, but my absolute favorite is Flickr Creative Commons. Of course, it goes without saying that you download the photo. Duh.
But for our purposes here, I'm just going to use one of the photos that comes standard with Windows (XP = My Documents > My Pictures > Sample Pictures, Vista = Public > Public Pictures > Sample Pictures).

== Step 2 ==
Open GIMP. Don't have GIMP yet? What are you waiting for? See my wreath prim-reduction tutorial for details on how to get GIMP.
In order to open GIMP, right click on your image that you've saved to your hard drive, and select “Edit with GIMP”.

 == Step 3 ==
Select the area you wish to make seamless. In your main GIMP window, click on your rectangle select tool. Then, down below in the individual tools option, check next to “Fixed”, choose “Aspect Ratio” from the drop-down list, and type in “1:1”. It is important when creating a Second Life seamless image to have it be a perfect square and this will force you to use a perfect square.
Then select a portion of your image that you wish to turn into the texture. The remainder of your image will be cropped away later, so keep that in mind.
== Step 4 ==
In order to crop down to the part we want, go to Image > Crop to Selection. Now all that should be left is your square (surrounded by the marching ants) and your sanity. Leave the marching ants.

== Step 5 ==
Now we get to make it tile. Go to Filters > Map > Make Seamless and click on it. Some moments later, the image will be rendered as an image that can seamlessly tile. If you want to make other textures from this one photo, play around with the other options under Filters > Map. Some are pretty cool.

== Step 6 ==
Our last step is to save this in a format that will upload well to Second Life. Recommended file format is “.tga”. Go to File > Save AS. Then when the next screen pops up, choose wear to save it and call it “Something.tga”. You have to type in the extension or else GIMP saves it in a format of its own choosing, which does not play nice with Second Life.
Now just go to Second Life and upload. That was easy!

As always, tips and blog post recommendations are greatly accepted, however Olivia **** (last name omitted for privacy reasons) has already paid me to post this tutorial for her. Yes, you, too, can have a post created just for you. Drop a comment here, or IM Jasmin Loire in-world with what you'd like to know. I'll tell you whether or not I know enough to help you out.
For now, this is -= Jasmin Loire =- signing off! Have a splendorous week. My real life students come back to school this week, so I know that I will be!
Labels: tutorial


for this post
Leave a Reply